 This blog item show a way of doing security, after some additional experience I consider this method as being non optimal. The server side does not change a lot (spring security configuration), but the client does. I explain my current solution is this blog post:Integration spring security and flex 3 the sequel/
This article is actually about two things. It explains the basic steps to use the new spring security version 2 library in a java (web) application. I am going to show the basic configuration as well as web resource authorization and bean methods authorization. The other part is the integration of flex with spring security. I am going to show how to use authentication from within flex 3 using the spring security back end. After that I’ll show a service used from within flex through blazeds to ask for the roles a logged in user has. Using these roles I am going to hide buttons to actions non admin users must not use. Like the create new book.![]() In short this article shows the complete picture of an application using flex 3, blazeds, spring security to authenticate users and authorize actions.
In short this article shows the complete picture of an application using flex 3, blazeds, spring security to authenticate users and authorize actions.
Read on if you want to learn about the integration of these frameworks.
Introduction
For a lot of my applications up till now I have used Acegi or spring security to take care of authentication and authorization. So the whole idea of securing certain url’s, presenting a login form, going to a database or ldap or whatever, checking password and obtain the roles a certain user has. This has become common through out all my jsp based web applications. Now I am moving into the flex domain. I have created an application that you can use to store all your books and browse through them. Now I want to make sure that not everybody can see the application, and only special users can insert and update books. Just because I know how to handle springframework at the server side, it seems logical to keep it that way. I have already written about the integration of flex and spring, now I want to reuse my security knowledge to secure my flex application.
One warning before you think this solutions solves all your problems. Please check the future directions, there are some differences between a normal web application and flex application in relation to session management and probably some other things as well.
So what do we need to do, let’s have a birds eye view over the complete solution:
- change the pom
- add a filter to your web.xml
- Configure the filter chain using the excellent new spring security namespace support.
- Configure the resources to secure (at first all)
- Fine tune the resources to secure, only *.html so everybody can download the flex swf file
- create the login form in flex, including the remote call and the event handling of the result.
- Implement method level security
- Create a remote call that returns the roles for an authenticated user
- Use the obtained roles to prevent showing the button to open the new book form.
Enough has been said, let’s start configuring the basic security. If you want to have a look at the source code, go to my google code project @ http://code.google.com/p/gridshore. Check the books-overview project.
Configuring Spring security (authentication and resource authorization)
First the changes in the pom file, we exclude the spring-support jar, this is important since we use spring 2.5.x and that version does not contain the spring-support module anymore. This results in some jars from spring 2.0.x due to the dependency from spring-security.
    <dependency>
        <groupId>org.springframework.security</groupId>
        <artifactId>spring-security-core-tiger</artifactId>
        <version>2.0.0</version>
        <exclusions>
            <exclusion>
                <groupId>org.springframework</groupId>
                <artifactId>spring-support</artifactId>
            </exclusion>
        </exclusions>
    </dependency>
That takes care of the needed jars on the classpath, now can actually start by adding a filter including mapping to the web.xml. If you look at the filter-mapping, you can see we pass everything to the spring security filter. This gives flexibility to the actually secured resources, but you can optimize it a bit.
    <filter>
        <filter-name>springSecurityFilterChain</filter-name>
        <filter-class>org.springframework.web.filter.DelegatingFilterProxy</filter-class>
    </filter>
    <filter-mapping>
        <filter-name>springSecurityFilterChain</filter-name>
        <url-pattern>/*</url-pattern>
    </filter-mapping>
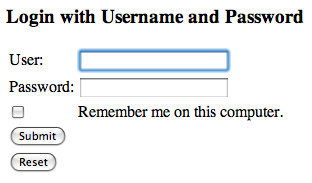
Next step is to implement security, the following lines of code secures all web resources and creates an in memory user store with two users. As you can see in the code, there is almost nothing to configure. Spring security makes use of a lot of sensible defaults. You do not even have to configure your own login screen. There is even a default version for that as you can see in the image after the code.
<?xml version="1.0" encoding="UTF-8"?>
<beans xmlns="http://www.springframework.org/schema/beans"
       xmlns:xsi="http://www.w3.org/2001/XMLSchema-instance"
       xmlns:security="http://www.springframework.org/schema/security"
       xsi:schemaLocation="
       http://www.springframework.org/schema/beans http://www.springframework.org/schema/beans/spring-beans-2.5.xsd
       http://www.springframework.org/schema/security http://www.springframework.org/schema/security/spring-security-2.0.xsd">
    <security:http auto-config="true">
        <security:intercept-url pattern="*" access="ROLE_USER"/>
    </security:http>
    <security:authentication-provider>
        <security:user-service>
            <security:user name="admin" password="admin" authorities="ROLE_USER, ROLE_ADMIN"/>
            <security:user name="user" password="user" authorities="ROLE_USER"/>
        </security:user-service>
    </security:authentication-provider>
</beans>
Now we can prevent people from downloading he swf file, could be a nice security thing, but not really what I want. I do not really care if they can download the swf, I care more about consistent look and feel and having some good authentication. Next step is to create the login form in the flex app.
Configure flex to use spring’s authentication
First we have to change the resources that are secured.
    <security:http auto-config="true">
        <security:intercept-url pattern="index.html" filters="none"/>
        <security:intercept-url pattern="*.swf" filters="none"/>
        <security:intercept-url pattern="*.html" access="ROLE_USER"/>
    </security:http>
Now that we have that out of our way, let’s have a look at the flex code. The Home.mxml is the application that gets started. First a public parameter called authorization, this parameter is of our on type AuthorizationControl and contains the username as well as the granted roles. Making this parameter public enables all other flex modules to ask for the value. Another function that is public and important for the same reason is the function isAuthorized. This returns false if the current user has not been authorized yet. After the screen has been created and is ready to be displayed we create the login form using the creationComplete event. The following function is called to create the login form and add it to the page. As you can see, we remove all the children of the main content panel before we add the login form.
    public function authenticateUser():void {
        myMainContentPanel.removeAllChildren();
        myMainContentPanel.addChild(new AuthenticationForm());
    }
Now we have a look at the implementation of the form. First the elements to present the form and the element that defines the remote http GET. In the code you’ll find the username TextInput, the password TextInput a Text element for showing a message in case of an authentication error and as said the element HttpService that defines the remote call. Take a good look at the HttpService element. We specify the special spring security url that we post the form to : j_spring_security_check. We define the method to call if everything goes well (result) as well as in case of an error (fault).
    <mx:HTTPService
            id="loginService"
            url="j_spring_security_check"
            showBusyCursor="true"
            method="POST"
            result="loginServiceResultHandler(event)"
            fault="loginServiceFaultHandler(event)">
        <mx:request>
            <j_username>{userName.text}</j_username>
            <j_password>{password.text}</j_password>
        </mx:request>
    </mx:HTTPService>
    <mx:Text id="authenticationMessage" visible="false" styleName="warning"/>
    <mx:Form defaultButton="{submitButton}">
        <mx:FormItem label="Username">
            <mx:TextInput id="userName"/>
        </mx:FormItem>
        <mx:FormItem label="Password">
            <mx:TextInput id="password" displayAsPassword="true"/>
        </mx:FormItem>
        <mx:FormItem>
            <mx:Button id="submitButton" label="submit" click="submitBook()"/>
        </mx:FormItem>
    </mx:Form>
In the code we saw three functions that are called when we push the login button, when a result comes back from the remote service and when an error comes back using the remote service. The function submitLogin just uses the remote service. The most interesting function is the loginServiceResultHandler. Here we call the initComponent function of the Application object. Remember we talked about this when discussing the Home.mxml. The result of this action is that we now have been authenticated on the server and we have security related information stored on the session.
        private function submitLogin():void {
            submitButton.enabled = false;
            loginService.send();
            submitButton.enabled = true;
        }
        private function loginServiceResultHandler(event:ResultEvent):void {
            Application.application.initComponent();
        }
        private function loginServiceFaultHandler(event:FaultEvent):void {
            authenticationMessage.text = "Problem while authentication ...";
            authenticationMessage.visible = true;
        }
We go back to the Home.mxml component. We now call the remote service booksSecurityServices and call the method obtainGrantedRoles which is actually a call to the spring bean. This bean uses some specific spring security classes to obtain the current authenticated user and requests the granted roles from this user. The object that is returned AuthorizationData has the same fields as the flex object AuthorizationControl. Using BlazeDS we obtain the data we want. If you want to know more about the configuration of blazeDS than check my previous post. Most important file is the remoting-config.xml.
public class BooksSecurityServicesImpl implements BooksSecurityServices {
    public AuthorizationData obtainGrantedRoles() {
        GrantedAuthority[] authorities =
                SecurityContextHolder.getContext().getAuthentication().getAuthorities();
        int numAuthorities = authorities.length;
        String[] grantedRoles = new String[numAuthorities];
        for (int counter = 0; counter < numAuthorities ; counter++) {
            grantedRoles[counter] = authorities[counter].getAuthority();
        }
        String username = SecurityContextHolder.getContext().getAuthentication().getName();
        return new AuthorizationData(grantedRoles,username);
    }
}
What do we do when we have received the AuthorizationControl instance? We assign it to our globally available authorization parameter. Then if the user is authorized we initialize the navigation object and clean out the main content panel. The next block of code shows the mxml component representing the remote object as well as the function that handles a successful call. The function isAuthorized is used to check if the authorization we have is not of type anonymous. This role is assigned to any user asking a resource going through the spring security filters
    <mx:RemoteObject id="securityService" destination="booksSecurityServices"
                     fault="authorizationFaultHandler(event)">
        <mx:method name="obtainGrantedRoles" result="handleReceivedGrantedRoles(event.result)"/>
    </mx:RemoteObject>

private function handleReceivedGrantedRoles(eventResult:Object):void {
    this.authorization = AuthorizationControl(eventResult);
    if (isAuthorized()) {
        var mainNavigation:MainNavigationComponent = new MainNavigationComponent();
        menuDock.addChild(mainNavigation);
        mainNavigation.visible = true;
        mainNavigation.addEventListener(components.MainNavigationEvent.SELECT_ITEM, eventAction);
        myMainContentPanel.removeAllChildren();
    }
}
public function isAuthorized():Boolean {
    return authorization != null && authorization.username != 'roleAnonymous';
}
Depending on the user that is logged on, we now have one or two buttons at the top of the screen. Users with the ROLE_ADMIN will see two buttons. One line of code I want to put under your attention is the one with an addEventListener. We will need this line when we start talking about he navigation menu component. Most important to know here is that we add a listener for our own event, just like we would for a click event to a button for instance. Let’s have a look at the important components.
Use user’s roles to hide some ui components
For the navigation we make use of a custom event when a button is clicked. This is used to determine the component to show in the main content panel when one of the buttons is clicked. If you look at the function initMyComponent you can see how we can determine whether we need to show the button for a new book. We make use of the globally available object Application.application which contains our object authorization. The function userIsAdmin just checks if the user has the role ADMIN. In the function clickEventHandler we create a new MainNavigationEvent which is catched by our Home.mxml component like I described.
    public class MainNavigationComponent extends HBox {
        public function MainNavigationComponent() {
            super();
            initMyComponent();
        }
        function initMyComponent():void {
            addChild(createNewButton('allbooks', 'All Books'));
            if (Application.application.isAuthorized() && Application.application.authorization.userIsAdmin()) {
                addChild(createNewButton('newbook', 'New Book'));
            }
        }
        private function clickEventHandler(event:Event):void {
            dispatchEvent(new MainNavigationEvent(MainNavigationEvent.SELECT_ITEM, event.currentTarget.id));
        }
        private function createNewButton(id:String, label:String):Button {
            var aButton:Button = new Button();
            aButton.id = id;
            aButton.label = label;
            aButton.addEventListener(MouseEvent.CLICK,clickEventHandler);
            return aButton;
        }
    }
For completeness I’ll also show the event stuff here. The next function is from the Home.mxml. It is called when the special event is catched. The event contains a method to create a new component that is displayed in the main content panel.
    private function eventAction(event:components.MainNavigationEvent):void {
        myMainContentPanel.removeAllChildren();
        myMainContentPanel.addChild(event.createRightUIComponent());
    }
The next block of code show our custom flex event component. The buttons pass the item that was clicked to the event and based on this value we created the appropriate component like FilteredBooks or BookForm.
    public class MainNavigationEvent extends Event {
        public static var SELECT_ITEM:String = 'selectitem';
        public var clickedItem:String;
        public function createRightUIComponent():UIComponent {
            var createdComponent:UIComponent;
            switch (clickedItem) {
                case 'allbooks' :
                    createdComponent = new FilteredBooks();
                    break;
                case 'newbook' :
                    createdComponent = new BookForm();
                    break;
                default:
                    var label:Label = new Label();
                    label.text = clickedItem;
                    createdComponent = label;
            }
            return createdComponent;
        }
        public function MainNavigationEvent(eventType:String,clickedItem:String) {
            super(eventType, false, false);
            this.clickedItem = clickedItem;
        }
    }
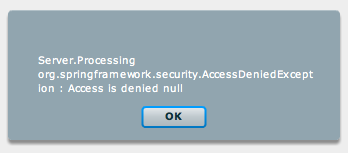
We are almost there. Now you cannot click on the new book button anymore. But it is possible we forget to secure something on the front-end. For the example I have forgotten to secure the update book screen. Now anybody can click on a book and go to the update screen. We need more security, therefore we implement method level security on the server side.
Configure the method level authorization in spring security
Implementing method level security using spring security is very easy, especially when you have done the steps we have done so far. We use aspectJ style pointcuts to select the object and methods that need a certain security role. In our case we select all objects with a name ending with Manager in the specified package. The methods starting with store need the role ROLE_ADMIN. The methods starting with obtain need to role ROLE_USER. To show that it works we open the list of books with the normal user, click on a book, make a change and get the message as shown in the following image. To my opinion this message is not nice, you should prevent the user from being able to do this as all. So do not present the update form but present the data in non updatable form instead.
    <security:global-method-security>
        <security:protect-pointcut
            expression="execution(* nl.gridshore.samples.books.business.*Manager.store*(..))"
            access="ROLE_ADMIN"/>
        <security:protect-pointcut
            expression="execution(* nl.gridshore.samples.books.business.*Manager.obtain*(..))"
            access="ROLE_USER"/>
    </security:global-method-security>
Future enhancements
I am having mostly problems with the session handling. You need to think hard about what to do when the flex app outlives the server session. I also had some problems with new sessions that got started when I did not expect it. This had to do with a remote call before trying to authenticate. What I would like to do is something like a re-authentication when the sessions has died automatically. You also need to think about the length of the session. What should happen if you remove a role from a certain user.
Conclusions
It turned out to become a long article. I hope you had the patience to read it all. I do not think it is very hard to integrate spring-security with flex. All the things I have done for normal web application I could do as well for the flex application. The spring security version 2 is a good enhancement, much easier configuration, but still the possibility to make it pretty complex. Convention over configuration is well used. As for flex, just a few remote calls like in our previous posts.
I hope you like the article, drop a comment if you have questions or if you have found this useful.
References
- http://www.mail-archive.com/flexcoders@yahoogroups.com/msg35921.html
- http://static.springframework.org/spring-security/site/reference/html/namespace-config.html
- Code sample (check the books-overview)