![]()
![]() At the moment I am doing a proof of concept for a customer together with two developers from the customer and a developer from Hippo. We are using the future product of hippo, Hippo 7. It is a nice technology stack using JackRabbit for the content repository and wicket as a view technology for the cms. The guys from Hippo are working very hard to come up with the first release of Hippo 7. This release has been rebuild from the ground up. One of the requirements for the project is a webservice that accesses the hippo repository and returns some information from the repository. That is what this post is about.
At the moment I am doing a proof of concept for a customer together with two developers from the customer and a developer from Hippo. We are using the future product of hippo, Hippo 7. It is a nice technology stack using JackRabbit for the content repository and wicket as a view technology for the cms. The guys from Hippo are working very hard to come up with the first release of Hippo 7. This release has been rebuild from the ground up. One of the requirements for the project is a webservice that accesses the hippo repository and returns some information from the repository. That is what this post is about.
This post will talk about connecting to the hippo repository using the spring framework. I’ll show a very basic (not production ready) connection pooling into the repository. Using this connection, the spring webservices project will step in and take over. Using spring-ws I am exposing a search into the documents.
Feel free to post a comment if you have questions, the sources are again available on google code.
I want to start with some references to the frameworks that I have used. That way you can try to follow along.
- Hippo ecm quickstart – easy access to start your own hippo repository. If you are having problems starting the application, check the start script and remove the -Xms stuff at the end of the file somewhere.
- Apache maven – Used to build the sample
- source code – The source code for the complete project.
- IntelliJ – You might try another IDE, but I cannot make any guarantees.
- SoapUI – Nice tool for testing the webservice, but any webservice client should be able to access the wsdl and use it.
Let’s start with the basics, I think you were able to get the hippo quickstart running. I am not going into details in that area, check the hippo documentation which is becoming very useful. Now that you have a running repository, you want to connect to it. Startup your favorite IDE (oke, no jokes anymore) and create a very difficult class with code as shown in the following piece of code.
String location = "rmi://localhost:1099/hipporepository";
HippoRepositoryFactory.setDefaultRepository(location);
HippoRepository repo = HippoRepositoryFactory.getHippoRepository();
Session session = repo.login("admin", "admin".toCharArray());
Workspace workspace = session.getWorkspace();
Query query = queryManager.createQuery(
	"//element(*,defaultcontent:article)[jcr:like(@defaultcontent:title,'%title%')]", Query.XPATH);
QueryResult queryResult = query.execute();
NodeIterator nodes = queryResult.getNodes();
while (nodes.hasNext()) {
    Node node = nodes.nextNode();
    System.out.println("title : " + node.getProperty("defaultcontent:title"));
}
session.close();
Problem is that you need a lot of dependencies to do this. You can look up the right document on the hippo website and download all the jars, you can also follow along and build it in a slightly more sturctured way. But in the end, this is all there is to it. First you get a reference to the Hippo repository, than you create a session by a executing a login. From the session you ask the workspace and the query manager. The querymanager is used to execute a query that looks for all documents of type defaultcontent:article with a title containing the word title. Then we use the QueryResult to print the actual titles from all found articles.
Now that we know how to connect to Hippo, we are going to use this knowledge to make it useable in the springframework world. The following image shows the interfaces and classes that we need to obtain a session.
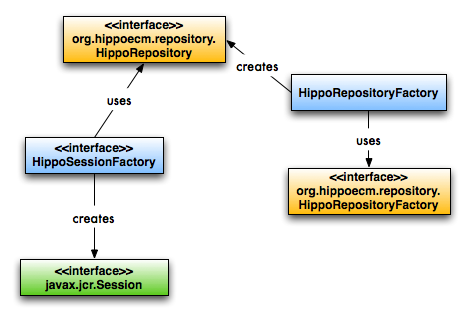
The image shows the blue HippoRepositoryFactory, blue means a gridshore class. This is a spring FactoryBean that creates an implementation of the HippoRepository, the orange ones are from Hippo. It uses the orange HippoRepositoryFactory to actually create the HippoRepository instance. Just like in the first code block I showed. The following code block shows the implementation of this class. The other blue item is the HippoSessionFactory. Implementations of this interface create sessions represented by the green color coming from the original JackRabbit libraries. We’ll discuss this class after the code block.
public class HippoRepositoryFactory implements FactoryBean, InitializingBean {
    private String location = "rmi://localhost:1099/hipporepository";

    public HippoRepositoryFactory() {
    }

    public HippoRepositoryFactory(String location) {
        if (null != location && !"".equals(location)) {
            this.location = location;
        }
    }

    public Object getObject() throws Exception {
        return org.hippoecm.repository.HippoRepositoryFactory.getHippoRepository();
    }

    public Class getObjectType() {
        return HippoRepository.class;
    }

    public boolean isSingleton() {
        return true;
    }

    public void afterPropertiesSet() throws Exception {
        org.hippoecm.repository.HippoRepositoryFactory.setDefaultRepository(location);
    }
}
The code block shows you we initialize the HippoRepositoryFactory wit the default location. We also need to implement the methods getObject() and getObjectType. This kind of classes can be used immediately in the spring configuration. The following code block shows part of this configuration in spring for the mentioned objects.
<beans xmlns="http://www.springframework.org/schema/beans"
       xmlns:xsi="http://www.w3.org/2001/XMLSchema-instance"
       xsi:schemaLocation="http://www.springframework.org/schema/beans http://www.springframework.org/schema/beans/spring-beans.xsd">
    <!-- loads the propety file from the classpath with some configuration parameters
         default file is loaded from the jar file. Place your on version ealier on the classpath.
     -->
    <bean id="jcrConfig" class="org.springframework.beans.factory.config.PropertyPlaceholderConfigurer">
        <property name="location" value="classpath:/jcrconfig.properties"/>
        <property name="placeholderPrefix" value="$jcr{"/>
    </bean>
    <!-- Special spring factory bean to create a HippoRepository instance -->
    <bean id="hippoRepositoryFactory" class="nl.gridshore.samples.hippo.impl.HippoRepositoryFactory">
        <!-- Since we use the default the following is optional -->
        <constructor-arg index="0" value="$jcr{jcr.rmi.connection.url}"/>
    </bean>
    <!-- Factory bean used to create new Sessions for the hippo repository -->
    <bean id="sessionFactory" class="nl.gridshore.samples.hippo.impl.HippoSessionFactoryImpl">
        <property name="hippoRepository" ref="hippoRepositoryFactory"/>
        <!-- following parameters are optional -->
        <property name="defaultUsername" value="$jcr{jcr.username}"/>
        <property name="defaultPassword" value="$jcr{jcr.password}"/>
    </bean>
</beans>
Now it is possible to create a client that uses the spring configuration to make a call to the hippo repository. Actually the following piece of code shows what you can do right now.
public class ReadRepository {
    public static void main(String[] args) throws RepositoryException {
        ApplicationContext ctx = new ClassPathXmlApplicationContext(new String[]{"connector-config.xml"});

        RepoSessionTemplate repoSessionTemplate = (RepoSessionTemplate) ctx.getBean("sessionTemplate");
        readNodes(repoSessionTemplate);
    }

    private static void readNodes(RepoSessionTemplate repoSessionTemplate) throws RepositoryException {
        QueryResult queryResult;

        queryResult = repoSessionTemplate.readFromSession(new SessionCallback() {
            public QueryResult readFromSession(QueryManager queryManager) throws RepositoryException {
                Query query = queryManager.createQuery(
                        "//element(*,defaultcontent:article)[jcr:like(@defaultcontent:title,'%title%')]", Query.XPATH);
                return query.execute();
            }
        });
        NodeIterator nodes = queryResult.getNodes();
        while (nodes.hasNext()) {
            Node node = nodes.nextNode();
            System.out.println("Node title : " + node.getName());
        }
    }
}
The result when you run this class, if you have your repository running, will be:
Node title : myarticle1
Node title : hippo:prototype
Node title : myarticle1
Node title : myarticle2
Oke I have to admit, I cheat. There are more classes used in this sample. But before I’ll go into these classes, I want to explain some very basic things of hippo, or using JackRabbit in general.
The entry point for doing something with a repository is the Session. Creating a session object is not a cheap operation. Therefore it is advisable to reuse created sessions when only reading data. Websites with a lot of traffic will find great performance increases when using a Session pool. To help people not to close session that need to be pooled, I have created a class hierarchy around the sessions and a session pool object. Another class I have created is the RepoSessionTemplate. This is a very common approach in the springframework world. It prevents you from having to write to much boiler plate code. The following image shows the relationships between the different classes.
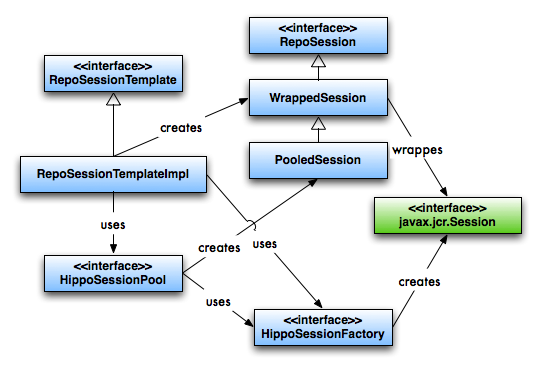
The image might be a bit overwhelming. I suggest you download the code and have a look at it. I think it is not really hard. There is a RepoSession interface that defines the methods that our clients might need when using a session. The WrappedSession represents a RepoSession that contains a wrapped repository session. The PooledSession is a special WrappedSession, it is not closed when you call the close() method. Instead it returns the session back to the pool. Now I want to have a look at the RepoSessionTemplate and it’s concrete implementation. This interface has two methods, one with username/password and one without. By providing a username, you will not get a pooled session. By omitting a username, you do get a pooled connection. No matter which path you choose to go, the template adapter will follow the same road, accept for creating the RepoSession. In the first situation it is created in the Template adapter itself using the session factory, in the other situation, the template makes use of the pool to obtain a RepoSession. Let’s have a look at the template adapter code.
    public QueryResult readFromSession(SessionCallback sessionCallback) throws RepositoryException {
        logger.debug("Read from session is called without username");
        RepoSession session = hippoSessionPool.obtainSession();
        return doReadFromSession(sessionCallback, session);
    }

    protected QueryResult doReadFromSession(SessionCallback sessionCallback, RepoSession session) throws RepositoryException {
        logger.debug("Execute the callback and close the session afterwards");
        QueryResult queryResult;
        try {
            Workspace workspace = session.getWorkspace();
            queryResult = sessionCallback.readFromSession(workspace.getQueryManager());
        } finally {
            session.close();
        }
        return queryResult;
    }
The structure is the same as the first code block I showed. In another code block you already saw the SessionCallback at work. I’ll repeat it in one of the following blocks of code when discussing the webservice part. Actually it is not a bad moment to start talking about that part of the application. We now have access to a mechanism to fire queries at the repository. Let’s use that to obtain a search parameter from a webservice request and return the found documents in a response.
So what do we need to create a webservice, well a guide to help us would be nice. Well you have multiple options. One is a blogpost I wrote quite some time a go: using spring-ws to create a webservice or the reference documentation. For the sample I used the reference manual, especially for the JDom part. Since it has been written down so well and I have the source code for you available, I will not go into the configuration of the webservice stuff. Check the file spring-servlet.xml and the xsd document.xsd. Instead of all that, let’s focus on the endpoint. The endpoint is used for analyzing the request as well as creating the response. I have chosen a payload endpoint, no need for all the soap specifics, I only want the actual content. Reading from the request is done using XPath expressions. Creating the response is done with JDom. The following piece of code shows you the first part of the class with request handling in it.
public class SearchNewsEndpoint extends AbstractJDomPayloadEndpoint {
    private static Logger logger = LoggerFactory.getLogger(SearchNewsEndpoint.class);

    private RepoSessionTemplate repoSessionTemplate;

    private XPath searchTextExpression;
    private Namespace namespace;

    public SearchNewsEndpoint() {
        namespace = Namespace.getNamespace("grid", "https://gridshore.nl/schemas");
        try {
            searchTextExpression = XPath.newInstance("//grid:SearchText");
            searchTextExpression.addNamespace(namespace);
        } catch (JDOMException e) {
            logger.error("Problem while creating an XPath");
            throw new EndpointConfigurationException("Problem in the SearchNewsEndpoint", e);
        }
    }

    protected Element invokeInternal(Element requestElement) throws Exception {
        final String searchText = searchTextExpression.valueOf(requestElement);
        ...
    }
}
In the code you see that I use the JDomPayload endpoint. I first create a namespace and using that namespace an XPath. By reading the xsd, you can see that the SearchRequest element must contain an element SearchText. This element contains the actual string that we use in the search. The searchTextExpression now contain the expression that we can use when a request comes in. The method invokeInternal is called when a request comes in and as you can see I obtain the value of the SearchText element and store it in the variable searchText. The following piece of code comes instead of the … above.
        Element searchResponse = new Element("SearchResponse", namespace);

        QueryResult queryResult = repoSessionTemplate.readFromSession(new SessionCallback() {
            public QueryResult readFromSession(QueryManager queryManager) throws RepositoryException {
                Query query = queryManager.createQuery("//element(*,defaultcontent:article)[jcr:like(@defaultcontent:title,'%"
                        + searchText + "%')]", Query.XPATH);
                return query.execute();
            }
        });
        NodeIterator nodes = queryResult.getNodes();
        while (nodes.hasNext()) {
            Node node = nodes.nextNode();
            Property title = node.getProperty("defaultcontent:title");
            Property introduction = node.getProperty("defaultcontent:introduction");
            Property body = node.getProperty("defaultcontent:body");
            Property uuid = node.getProperty("jcr:uuid");

            Element articleElement = new Element("Article", namespace);
            articleElement.setAttribute("uuid",uuid.getString());
            Element titleElement = new Element("Title", namespace);
            Element introductionElement = new Element("Introduction", namespace);
            Element bodyElement = new Element("Body", namespace);

            titleElement.setText(title.getString());
            introductionElement.setText(introduction.getString());
            bodyElement.setText(body.getString());

            articleElement.addContent(titleElement);
            articleElement.addContent(introductionElement);
            articleElement.addContent(bodyElement);
            searchResponse.addContent(articleElement);
        }

        return searchResponse;
All the Elements are JDom elements and will be transformed into a valid response. You can see the first element SearchResponse, which will be given multiple Article elements, and so on. The repoSessionTemplate is used to execute the query and in the end obtain the Nodes containing the articles with a title containing the entered text. Using the getProperty methods I can obtain the actual data and create a response out of it.
That is about it, now you can fire up your web project containing the spring-ws project. If your repository is still running you should be able to send a request and get a response. For those of you not familiar with a webservice client, I recommend using SoapUI.
When soapui is running, go to File > New Project. A wizzard will appear. Enter the following url into the Initial wsdl/wadl box.
http://localhost:8081/searchService/search.wsdl
The result should be a Request 1, double click it to open. Change the value of SearchText into title, push the run button and you should receive the following response.
<SOAP-ENV:Envelope xmlns:SOAP-ENV="http://schemas.xmlsoap.org/soap/envelope/">
   <SOAP-ENV:Header/>
   <SOAP-ENV:Body>
      <grid:SearchResponse xmlns:grid="https://gridshore.nl/schemas">
         <grid:Article uuid="118b876b-fc73-4400-89b8-5a0e2153628d">
            <grid:Title>title published version</grid:Title>
            <grid:Introduction>introduction</grid:Introduction>
            <grid:Body>body</grid:Body>
         </grid:Article>
         <grid:Article uuid="2b2c3f3c-a738-4ca6-a0d6-30eac3ca8c55">
            <grid:Title>title</grid:Title>
            <grid:Introduction>introduction</grid:Introduction>
            <grid:Body>body</grid:Body>
         </grid:Article>
         <grid:Article uuid="db1bddc5-d29f-47a1-ac12-b34d97a82715">
            <grid:Title>title</grid:Title>
            <grid:Introduction>introduction</grid:Introduction>
            <grid:Body>body</grid:Body>
         </grid:Article>
         <grid:Article uuid="b363e8be-2ec7-4f62-8ba0-2f9c7a335b17">
            <grid:Title>title</grid:Title>
            <grid:Introduction>introduction</grid:Introduction>
            <grid:Body>body</grid:Body>
         </grid:Article>
      </grid:SearchResponse>
   </SOAP-ENV:Body>
</SOAP-ENV:Envelope>
Wow, cool isn’t it? That is about it. Hope you liked it and can use it. Thanks to Jeroen Reijn from Hippo for helping with well euh Hippo and Allard for the thinking with me on the Sessions and pooling stuff.
Pingback:Gridshore » Connecting to Hippo ecm using a springframework connector