Within the JEE platform a rather common and well-understood system of configuration is based on the Chain of Responsibility and the Event Delivery patterns: the life cycle of enterprise components starts with achieving a general configuration goal. However, on top of this goal, the system defines a number of pre-goals that the system must achieve in combination with an event system that allows configurable actions to be undertaken when the system tries to achieve a pre-goal or the final goal. A typical example is the configuration and starting of a servlet. The servlet is configured in a configuration file and the servlet container reads this file, instantiates and initializes the servlet and puts it in the wait state, waiting for requests. But there is more involved: init parameters are set and the servlet context is initialized. Each step generates a runtime event that listeners can listen for and respond to. The standard configuration of the Spring context in JEE web applications uses this model to load context files through the ContextLoaderListener.
The Java Instrumentation API on the other hand is not nearly as well-understood or even as well known. Yet it makes it possible to instrument each and every Java program with a similar Chain of Responsibility mechanism as the JEE standards provide out of the box. The mechanism is used by debuggers and frameworks like AspectJ that have to make just-in-time adjustments to classes as they are loaded.
As a small introduction this article examines the creation of a Spring context loader mechanism for standalone Java Apps. This mechanism is, in truth, not very useful. But it’s a simple and effective exercise to learn the technique.
Instrumentation basics
Instrumentation in the JVM has been designed using the Chain of Responsibility pattern. In the “classic” Java standalone program, the entry point into the program is the public static void main(String[] args) method of some class in the program, which is called by the JVM executable. The instrumentation mechanism allows you to insert code between the JVM executable and the main method which can perform some tasks before the actual program start. Note that the formal program entry point is still the main method. The following figure compares the two situations:

A classic, non-instrumented Java program
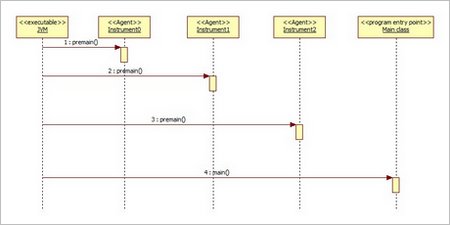
A Java program instrumented by agents
The sequence diagram above shows the instrumentation mechanism in action: before entering the main method, the JVM has the thread of control execute some other code (zero or more blocks of code) first. Each block of code executed before the program entry point is included in a class called an agent and is accessed through a method with the fixed name premain.
The premain method serves much the same purpose as the well-known main method: it is an entry point, it has a fixed name so the JVm can find it and it has some parameters so that the JVM can pass in some arguments. The two main differences between main and premain in fact are the exact method name (shouldn’t be too hard to remember which is which though…) and the exact parameters the methods take.
You see, where the main method takes a String[] with command line arguments, the premain method takes either a single String or a String and an java.lang.instrument.Instrumentation argument. The Instrumentation object is provided by the JVm and allows an Agent to make changes to classes of the program (more about that later). The String allows the JVM to pass in arguments from the command line. Note that these are not (in principle) the same command line arguments as go to the main method — and that you don’t get the arguments split into an array like the main method; they’re all in a single string and you’ll have to parse that yourself.
An example
As an example of building a simple agent, let’s create an analog to the Spring ContextLoaderListener for JEE Web applications: a SpringContextLoaderAgent that reads some context files to create an org.springframework.context.ApplicationContext. As explained above, we’ll just have to create a class (called an agent) that has a premain method. This is the template to fill in:
import java.lang.instrument.Instrumentation;

public class SpringContextLoaderAgent
{
    public static void premain(final String agentArgs, final Instrumentation inst)
    {
    }
}
Creating an application context is not that different: we can just instantiate an org.springframework.context.support.ClassPathXmlApplicationContext. Exposing this context to the rest of the application need also not be difficult — a static variable and a getter method is good enough for an example. Really the largest problem here getting the names of the context files to read. Since the task here is to emulate the ContextLoader we could do worse than to assume we will get a string containing context file names separated by comma’s. Let’s assume this string will be our String argument; we just have to parse it ourselves and take into account that there may be only one file named in the string. This is the result:
import java.lang.instrument.Instrumentation;
import org.springframework.context.ApplicationContext;
import org.springframework.context.support.ClassPathXmlApplicationContext;

public class SpringContextLoaderAgent
{
    private static ApplicationContext applicationContext;

    public static void premain(final String agentArgs, final Instrumentation inst)
    {
        String[] contextFiles = null;
        if (agentArgs != null && agentArgs.contains(","))
        {
            contextFiles = agentArgs.split(",");
        } else
        {
            contextFiles = new String[] { agentArgs };
        }

        SpringContextLoaderAgent.applicationContext = new ClassPathXmlApplicationContext(contextFiles);
    }

    public static ApplicationContext getApplicationContext()
    {
        return SpringContextLoaderAgent.applicationContext;
    }
}
Instrumenting the JVM
So, with the agent written, there’s one thing left to do: getting the JVM to make use of the agent. Explaining to the JVM what you want it to do is a two-step process:
- Package the agent into a JAR with a correct manifest file.
- Pass the correct command-line argument to the JVM.
The manifest file
As you probably know, you can create an executable JAR file by including a manifest file that identifies the class with the main method for the contained application using a Main-Class attribute. To create an agent JAR you do something similar: identify the agent class (the class with the premain) in the manifest using a Premain-Class attribute.
Invoking the JVM
Once your agent JAR is ready, you still have to invoke the JVM. To include one agent, use the –javaagent command line switch when invoking the JVM; append that with a colon and the full path of your agent jar. For instance:
java -javaagent:$PROGRAM/lib/spring-context-loader-agent.jar .....
In order to pass in command line arguments to the agent, append them to the switch like so:
java -javaagent:$PROGRAM/lib/spring-context-loader-agent.jar=classpath:applicationContext.xml,classpath:anotherContextFile.xml ...
In order to have multiple agents invoked, use multiple -javaagent switches. The agents will be invoked in the order of the command-line switches.
Advanced agents
This article only demonstrates the basics of creating an agent. However, an agent is capable of some remarkable and powerful things. Specifically, the instrumentation spec allows agents to load, reload, transform and retransform classes. For instance, agents can dynamically rewrite JVM bytecodes to include debugging markers or Clover-style position markers. The AspectJ framework uses the agent instrumentation mechanism for load-time aspect weaving.
Agents also don’t have to kick in at launch time: instrumentation implementations can allow agents to launch at runtime in the middle of a program run. Note that this must be signalled in the manifest as well.
Conclusion
This article has covered the basics of creating agents to instrument the JVM. It also includes an example of a very simple agent to load Spring contexts for an application.
Pingback:Gridshore » Injecting Domain objects with Spring