More than a year a go I started writing about flex. My first post was about the integration of BlazeDS with the springframework at the back-end using intellij. I moved on with a Datagrid component that had filtering included in my second post. Than I did two posts about integrating spring security. The first article was a nice start to understand the concepts. The second post improved the code a lot with more understanding of the flex principles.
With the next posts I moved on to use maven, which in the beginning was not easy, but thanks to the excellent flex-mojos plugin from velo. In the beginning of this year I started blogging about the springsource coming into the flex domain for real. Two projects, one for the spring style of programming in the ActionScript language. The other one for integrating BlazeDS and the spring framework. I wrote multiple posts about the new spring project. This post will probably not be the last. But if you are using Mate as well as the spring BlazeDS Integration project. This is a must read post. Maybe only to laugh at what I have done, but I hope to be amazed how simple a full flexed application can be when you combine all these technologies.
Kind of a long introduction, but what is this post really about? I have been using a sample application called books-overview that I have been using for flex based applications. I have been adding stuff to it once in while, but now I have completely refactored it. I am using a framework called Mate, have made it modular using the flex-mojos plugin and I have adopted the Spring BlazeDS integration project. Time to explain the way I handle security now, how I am using maven and show the extension to Mate for security.
Read on to find out how I did it and like always leave a comment if you like it or if you have improvements.
The books-overview sample
The books overview sample is a very easy application. You need to login to get access to the application. You can get two different roles. A normal user can look at the books, and admin user can also add books. The domain model is very easy. There are two entities; book and author. A book can have multiple authors and an author can write multiple books. I think the architecture is pretty straightforward. The basic business layer, dao layer, domain component and a web project containing the BlazeDS and flex components. We use spring-security to implement authentication as well as authorization. All data is stored in an in memory database and everything is build using maven. You can find the code in google code, checkout the trunk with the following command:
svn checkout http://gridshore.googlecode.com/svn/trunk/books-overview gridshore-books-overview
To tests if it works, you can use the following commands:
- step into the directory where you just checked out the sample
- mvn clean install (you might have to install some artifacts yourself that are not available in a repository)
- cd books-web
- mvn clean jetty:run-war
- open your browser with the url: http://localhost:8080/books-web
You should see the login screen, enter user admin with password admin and you should see the following screen:
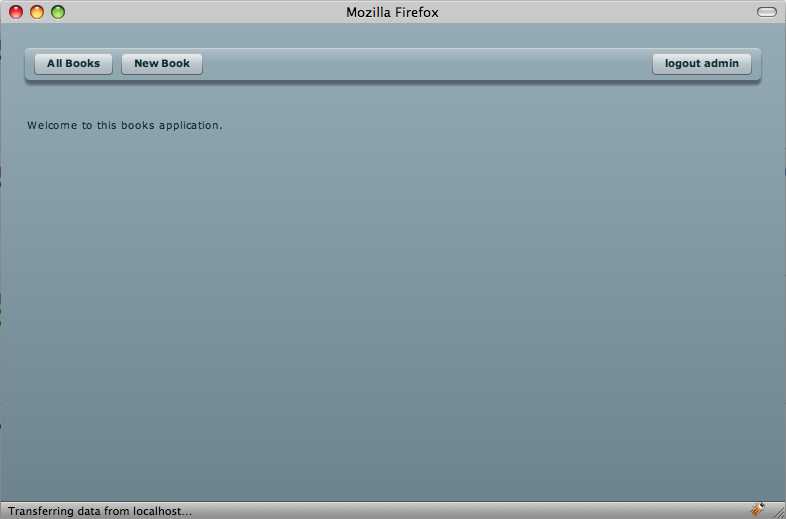
It looks like a pretty easy screen, but a lot has happened before this screen is presented to you. Most important to know for now is that the New Book button is only available when logged in as admin. The name can be seen in the logout button on the right. This time with the label logout admin. You can now experiment with the application a bit. That way you will better understand what is happening in the code.
Setting up the maven build
For my development I use a combination of building with maven and writing code within intellij. Maybe I should invest more time to build with intellij as well, but I keep having problems with it. The workflow of building with maven in a command line is now so easy that I settle with that. Though I do miss the debugging, maybe I’ll step into it once more. A very cool feature of intellij is that it can group projects into modules. You can make intellij create these modules automatically based on maven structures. Pom projects become modules. That way grouping your flex projects to give them common dependencies becomes very easy. That is what I have done for the sample.

Lets have a look at the dependencies and some build specifics. The parent pom contains the following dependencies: flex.sdk.version=3.2.0.3958, spring-actionscript=0.7.1, mate.version=0.8.7.1, flex-mojos.version=3.2.0
<dependency>
    <groupId>com.adobe.flex.framework</groupId>
    <artifactId>flex-framework</artifactId>
    <version>${flex.sdk.version}</version>
    <type>pom</type>
</dependency>
<dependency>
    <groupId>org.springframework</groupId>
    <artifactId>spring-actionscript</artifactId>
    <version>${spring-actionscript.version}</version>
    <type>swc</type>
</dependency>
<dependency>
    <groupId>com.asfusion</groupId>
    <artifactId>mate</artifactId>
    <version>${mate.version}</version>
    <type>swc</type>
</dependency>
<!-- testing -->
<dependency>
    <groupId>org.sonatype.flexmojos</groupId>
    <artifactId>flexmojos-unittest-support</artifactId>
    <version>${flex-mojos.version}</version>
    <type>swc</type>
    <scope>test</scope>
</dependency>
The build section for both of the flex modules is the same. The only difference is the packaging. For the security model it is swc and for the mate module it is swf. The mate modules is actually not a very good name, it contains the application, maybe I should call it main or so. The build section of the pom looks like this:
    <build>
        <sourceDirectory>src/main/flex</sourceDirectory>
        <testSourceDirectory>src/test/flex</testSourceDirectory>
        <plugins>
            <plugin>
                <groupId>org.sonatype.flexmojos</groupId>
                <artifactId>flexmojos-maven-plugin</artifactId>
                <version>${flex-mojos.version}</version>
                <extensions>true</extensions>
                <configuration>
                    <contextRoot>/books-web</contextRoot>
                    <mergeResourceBundle>true</mergeResourceBundle>
                    <resourceBundlePath>${basedir}/src/main/locale/{locale}</resourceBundlePath>
                    <locales>
                        <locale>en_US</locale>
                        <!--<locale>nl_NL</locale>-->
                    </locales>
                </configuration>
            </plugin>
        </plugins>
        <defaultGoal>install</defaultGoal>
        <resources>
            <resource>
                <directory>${basedir}/src/main/resources</directory>
            </resource>
        </resources>
    </build>
The other big maven thing to configure is the server side. This you can find in the books-web project. There are dependencies for BlazeDS and the spring-flex project containing the BlazeDS spring integration. Please check the code if you want to see more of it. The last thing I want to show about maven are the repositories I use to find most of the artifacts. You do need to install some manually, but most of them come from an existing repository:
    <repositories>
        <repository>
            <id>flex-mojos-repository</id>
            <url>http://repository.sonatype.org/content/groups/public</url>
            <releases>
                <enabled>true</enabled>
            </releases>
            <snapshots>
                <enabled>false</enabled>
            </snapshots>
        </repository>
        <repository>
            <id>fnh</id>
            <url>http://fna.googlecode.com/svn/trunk/fna/fna_m2_repository/</url>
        </repository>
        <repository>
            <id>Servebox</id>
            <url>http://maven.servebox.org/repository</url>
            <releases>
                <enabled>true</enabled>
            </releases>
            <snapshots>
                <enabled>false</enabled>
            </snapshots>
        </repository>

        <repository>
            <id>spring-milestone</id>
            <name>Spring Portfolio Milestone Repository</name>
            <url>http://maven.springframework.org/milestone</url>
            <releases>
                <enabled>true</enabled>
            </releases>
            <snapshots>
                <enabled>false</enabled>
            </snapshots>
        </repository>
    </repositories>
    <pluginRepositories>
        <pluginRepository>
            <id>flex-mojos-repository</id>
            <url>http://repository.sonatype.org/content/groups/public</url>
            <releases>
                <enabled>true</enabled>
            </releases>
            <snapshots>
                <enabled>false</enabled>
            </snapshots>
        </pluginRepository>
    </pluginRepositories>
Enough about maven, lets move on to the flex side.
Introducing Mate, a flex framework
![]() Mate is a tag-based, event-driven Flex framework. At least that is what the website states. Event driven is very important. If you follow the recommended way to create your application you get a clean separation of front end components that show data, forms and interaction components. Each action should lead to an event, which is handled by Mate. Most of the logic is put into manager components.
Mate is a tag-based, event-driven Flex framework. At least that is what the website states. Event driven is very important. If you follow the recommended way to create your application you get a clean separation of front end components that show data, forms and interaction components. Each action should lead to an event, which is handled by Mate. Most of the logic is put into manager components.
Lets have a look at what happens when you click on the All Books button. The MainNavigation.mxml contains a button that calls the following code when the button is clicked.
private function doObtainAllBooks():void {
    var event:BooksEvent = new BooksEvent(BooksEvent.OBTAIN_ALL_BOOKS);
    dispatchEvent(event);
}
As you can see, this only dispatches and event. Mate uses an mxml component with a lot of special tags to handle events. This handling can result in calling remote services, manager classes, dispatching new events and injecting data into view components. The following code block shows the capturing of this event, calling a remote service to obtain the books, giving the books to a manager, injecting the results into the AllBooks.mxml view component. Finally a new navigation event is dispatched to open the view component. The names of the tags give a clear description of what is going on.
<EventMap xmlns:mx="http://www.adobe.com/2006/mxml" xmlns="http://mate.asfusion.com/">
    ...
    <mx:RemoteObject id="booksService"
                     endpoint="http://{props.host}:{props.port}/{props.webcontext}/messagebroker/amf"
                     destination="remoteBookManager"/>

    <EventHandlers type="{BooksEvent.OBTAIN_ALL_BOOKS}" debug="true">
        <RemoteObjectInvoker instance="{booksService}" method="obtainAllBooks">
            <resultHandlers>
                <MethodInvoker generator="{BooksManager}" method="storeBooks" arguments="{resultObject}"/>
                <EventAnnouncer generator="{MainNavigationEvent}" type="{MainNavigationEvent.NAVIGATION}">
                    <Properties navigationId="{MainNavigationEvent.ALL_BOOKS}"/>
                </EventAnnouncer>
            </resultHandlers>
        </RemoteObjectInvoker>
    </EventHandlers>
    <Injectors target="{AllBooks}">
        <PropertyInjector source="{BooksManager}" sourceKey="books" targetKey="books"/>
    </Injectors>
    ...
</EventMap>
Now have a look at the code of the BooksManager component. Calling the actual remote object and transforming java objects into flex objects is done using BlazeDS. More on this later on. The objects that you get back are Books.
public class BooksManager {
    [Bindable]public var books:ArrayCollection = new ArrayCollection();

    public function storeBooks(obj:Object):void {
        books = ArrayCollection(obj);
    }
}

[Bindable]
[RemoteClass(alias="nl.gridshore.samples.books.domain.Book")]
public class Book {
    public var id:Number;
    public var title:String;
    public var isbn:String;
    public var authors:ArrayCollection = new ArrayCollection();

    public function Book() {
    }

    public function addAuthor(author:Author):void {
        authors.addItem(author);
    }
}
That was your crash coarse in Mate. If you want to know more about the basics, be sure to check out their website. A lot of links to other good resources are available. Time to move on. For the security part I need to extend Mate. That is what the next section is about
Implementing authentication in the flex client
With respect to the authentication there are three different events that take place:
- Check if needs authentication – If the current client is not authenticated the login form must be presented
- Try authentication – check the provided credentials, show an error message if authentication fails or go to the initial screen.
- Logout – logout from the client
The handling of these three events can be found in the SecurityEventMap.mxml component. This part of the solution has changed the most with respect to previous versions of the sample. In the current release I make use of the standard capabilities of the flex class mx.messaging.ChannelSet. I have created an extension to interact with this channelset using tags, the ChannelSetInvoker. Creating this class was not easy to me, there is a document that can help and the source code from existing tags is very helpful. I run by some things I learned while creating the extension.
A very important part is to make a difference to properties that you need to configure the component and arguments to the methods being called. The ChannelSet will not change and can be provided as a property. The username and password for the login method are arguments to the method and need to be provided as arguments. Within the source code you can see the difference as well, the ChannelSet is a property of the component, while username and password are not really visible in the code. The ChannelSetInvoker component uses the ResultEvent and the FaultEvent to communicate with handlers. You can register handlers in the Mate event mapping component. Of course we need to registers these handlers within the component. This is done in the complete function
    override protected function complete(scope:IScope):void {
        if (this.resultHandlers && resultHandlers.length > 0) {
            this.createInnerHandlers(scope, ResultEvent.RESULT, resultHandlers);
        }
        if (this.faultHandlers && faultHandlers.length > 0) {
            this.createInnerHandlers(scope, FaultEvent.FAULT, faultHandlers);
        }
    }
Time to move on to the fun part, the actual interaction with the ChannelSet. The components supports three methods (think about the three events we needed): login, logout and authenticated. The magic takes place in the run function.
    override protected function run(scope:IScope):void {
        var argumentList:Array = (new SmartArguments()).getRealArguments(scope, this.arguments);
        innerHandlersDispatcher = channelSet;

        if (method == "login") {
            if (!channelSet.authenticated) {
                var loginToken:AsyncToken = channelSet.login(argumentList[0], argumentList[1]);
                loginToken.addResponder(new AsyncResponder(
                        function(event:ResultEvent, token:Object = null):void {
                            scope.lastReturn = event.result;
                            innerHandlersDispatcher.dispatchEvent(event);
                        },
                        function(event:FaultEvent, token:Object = null):void {
                            scope.lastReturn = event.fault;
                            innerHandlersDispatcher.dispatchEvent(event);
                        }));
            }
        } else if (method == "logout") {
            var logoutToken:AsyncToken = channelSet.logout();
            logoutToken.addResponder(new AsyncResponder(
                    function(event:ResultEvent, token:Object = null):void {
                        innerHandlersDispatcher.dispatchEvent(event);
                    },
                    function(event:FaultEvent, token:Object = null):void {
                        innerHandlersDispatcher.dispatchEvent(event);
                    }));
        } else if (method == "authenticated") {
            var isAuthenticated:Boolean = channelSet.authenticated;
            scope.lastReturn = isAuthenticated;
            var event:ResultEvent = new ResultEvent("user is authenticated?", false, true, isAuthenticated);
            innerHandlersDispatcher.dispatchEvent(event);
        }
    }
Check how we use the provided arguments in the login method handling. AsyncToken objects are used to handle the asynchronous results of the login and logout methods. Finally the innerHandlerDispatcher is used to notify the registered handlers of new results. For the final piece of the puzzle, have a look at the implementation of the event handling. Due to the names of the tags the code is self explanatory.
<EventMap xmlns:mx="http://www.adobe.com/2006/mxml" xmlns="http://mate.asfusion.com/"
xmlns:extensions="extensions.*">
<mx:ChannelSet id="authenticationChannelSet">
<mx:AMFChannel id="myAmf" uri="http://{props.host}:{props.port}/{props.webcontext}/messagebroker/amf"/>
</mx:ChannelSet>
<!-- Event handlers -->
<EventHandlers type="{AuthenticationEvent.TRY}" debug="true">
<extensions:ChannelSetInvoker method="login"
channelSet="{authenticationChannelSet}"
arguments="{[event.username,event.password]}">
<extensions:resultHandlers>
<MethodInvoker generator="{AuthenticationManager}" method="logInSuccess"
arguments="{currentEvent.result}"/>
</extensions:resultHandlers>
<extensions:faultHandlers>
<MethodInvoker generator="{AuthenticationManager}" method="storeAuthenticationProblem"
arguments="{currentEvent.fault}"/>
</extensions:faultHandlers>
</extensions:ChannelSetInvoker>
</EventHandlers>
<EventHandlers type="{AuthenticationEvent.CHECK_NEEDS}" debug="true">
<extensions:ChannelSetInvoker method="authenticated" channelSet="{authenticationChannelSet}">
<extensions:resultHandlers>
<MethodInvoker generator="{AuthenticationManager}" method="isAuthenticated"
arguments="{currentEvent.result}"/>
</extensions:resultHandlers>
</extensions:ChannelSetInvoker>
</EventHandlers>
<EventHandlers type="{AuthenticationEvent.LOGOUT}" debug="true">
<extensions:ChannelSetInvoker method="logout" channelSet="{authenticationChannelSet}">
<extensions:resultHandlers>
<MethodInvoker generator="{AuthenticationManager}" method="logout"/>
</extensions:resultHandlers>
</extensions:ChannelSetInvoker>
</EventHandlers>
</EventMap>
To be able to actually authenticate, we need a server component as well. With the RC2 release of the spring-flex project this has become incredibly easy. The next section talks about that part of the application.
Spring-flex, how easy can it be.
I do want to stress that the documentation coming with spring-flex is a good read. I recommend to read it to see all options that you have. For now I discuss only the basic steps.
http://static.springframework.org/spring-flex/docs/1.0.x/reference/html/ch04s02.html
- Configure the web.xml, add the dispatcher servlet and the springSecurityFilterChain for the initialization of spring security.
- I added one servlet mapping for *.properties. This is for loading the config.properties file through a spring bean. Check my post flex remoting without configuring the client to find out more on this topic.
- Configure BlazeDS using the services-config.xml file in the default location WEB-INF/flex. Remember that we do not need this file in the flex client anymore like we did in the past. It is also this file where you configure BlazeDS logging.
- Configure the security, be sure to look good before it is over.
    <!-- Bootstraps and exposes the BlazeDS MessageBroker -->
    <flex:message-broker>
        <flex:secured />
    </flex:message-broker>

    <!-- remote proxies -->
    <flex:remoting-destination destination-id="remoteBookManager" ref="bookManager" exclude-methods="internalUseStoreBook"/>

    <security:http entry-point-ref="preAuthenticatedEntryPoint"/>

    <bean id="preAuthenticatedEntryPoint"
        class="org.springframework.security.ui.preauth.PreAuthenticatedProcessingFilterEntryPoint" />

    <security:global-method-security>
        <security:protect-pointcut
            expression="execution(* nl.gridshore.samples.books.business.*Manager.store*(..))"
            access="ROLE_ADMIN"/>
        <security:protect-pointcut
            expression="execution(* nl.gridshore.samples.books.business.*Manager.obtain*(..))"
            access="ROLE_USER"/>
    </security:global-method-security>

    <security:authentication-provider>
        <security:user-service>
            <security:user name="admin" password="admin" authorities="ROLE_USER, ROLE_ADMIN"/>
            <security:user name="user" password="user" authorities="ROLE_USER"/>
        </security:user-service>
    </security:authentication-provider>
As you can see, most of the configuration deals with method-security and the authentication provider. It takes around 5 lines of code to configure spring security to receive all incoming authentication requests and connect to BlazeDS security. I think this is pretty amazing. During the refactoring I could remove a lot of configuration and a java class. Also the client code has become a lot easier and adheres to standards of flex remoting.
Concluding
That is it, now we have a much cleaner sample. Be sure to check out the code and of course the referring frameworks. I also want to mention the extendability of the Mate framework. At first I had to understand some basic concepts, but than it become easy to write an extension. I hope you like the blog. Questions and commands are welcome.
See you again next time.