![]()
One of the technical fashionable terms is NoSQL. That is not really the reason why I wanted to have a look at it, but still it is a good reason to at least have an understanding of what it is. The best way to do this is to try it out. Together with Allard I am creating a new sample for the Axon framework. This sample must support a lot of inserts and fast queries. This can be done using an sql database, but using a NoSQL database felt good as well. Therefore I started replacing the jpa implementation with a Mongodb implementation. This blog post is about the things I have learning while implementing Mongo. Be warned, I am not an expert, so if you spot improvement, please let me know.
Introduction
First a warning, I am not going to explain a lot about the basics of Mongo. Still I’ll write down why I was curious enough to try it out and I give some pointers to where you can find more information.
So why MongoDB. They claim to have the ideal combination of storing documents in a flexible manner and still be able to search them in ways you would do with a relational database. Storing documents instead of rows in tables feels more natural. I have been using Hippo now for a few years. They use JackRabbit for a datastore. They store everything in trees. Performance and scalability are not very easy to accomplish. Therefore I am very curious what storing documents in MongoDB will bring. The way MongoDB deals with searches is interesting. You can create queries that use nested properties of a document to query on. I’ll have some samples, especially for things like sorting and paging through your results.
As you should know from this blog, I am a java programmer. Therefore I need to connect to Mongo through a java API. Mongo supports a lot of different Drivers to connect to it. Of course a java driver is available as well. I’ll show you some things that were harder to find in the normal api documentation.
You probably know Mongo does not have real transactions. Well that is the whole intention. MongoDB does support other mechanisms to make sure data is consistent, however, by default it is more optimized for speed. I’ll go over some things like “Write Concern”, “Batch inserts”.
As a jpa/hibernate user you are probably familiar with object relation mappings (ORM). Well we do not need an ORM tool, but still we need to transform query results into objects and objects into documents. Ok you might not need to immediately, but believe me there will be a moment that you need to. Therefore I’ll have a go at them as well.
Scalability is another beast that MongoDB should support pretty well. Therefore I started experimenting with the technology using a few virtual machines. In the last part of this blog I’ll discuss some of my findings.
Basic stuff
Installation
There are a number of ways to install MongoDB. For most common operating systems packages are available. Later on when I have created a few VMWare images I’ll use this installation guide:
http://www.mongodb.org/display/DOCS/Ubuntu+and+Debian+packages
Most of the time I work with the binary download and start it up myself. Later on, this is also the most easy way to experiment with Replica sets. Just download the right package from the following location for your OS. Unpack and run the mongod script in the bin folder.
http://www.mongodb.org/downloads
First steps
Start up the mongodb instance and the client. When connected, execute the command show dbs, in my case this results in the following output:
admin
axonframework
axontrader
local
I am using a sample application created with the axon framework. The sample is the axon trader. All the axonframework related items are stored in the axonframework database. This database contains the following collections, obtained with the command: show collections. Before you can do that, you need to choose the right database to start working with. In my case I start with the axonframework database: use axonframework.
> show collections
domainevents
system.indexes
Of course I am not going to explain all commands here, the last one I want to mention explicitly is the help command, really useful: help.
Storing and searching
Mongo is used to store documents. Documents are stored in collections. Storing is done using insert() or save(). The structure of the document is not really important. The following commands create a new database, collection and insert a document, query for all blog documents and drops the complete table again:
use gridshore
db.blogs.insert({title:"my first blog", main:"And this is the content of my blog"})
db.blogs.find()
db.blogs.drop()
Now let us assume we have a lot of blogs and we want to search for all blogs with a tag “Mongo”. Creating such a document and searching for that document including the result is presented in the following lines.
> db.blogs.insert({title:"my first blog", main:"And this is the content of my blog",tags:["Java", "Mongo"]})
> db.blogs.find({tags:"Mongo"})
{ "_id" : ObjectId("4c95fa6830d8854d0fdece13"), "title" : "my first blog", "main" : "And this is the content of my blog", "tags" : [ "Java", "Mongo" ] }
Let us move on. Since I am mainly a java programmer, I need a java api. The next section is about the Java Driver
Java driver
From the mongodb website you can download the java driver, it is also available in the maven repository. After that it all starts with the class com.mongodb.Mongo. This class contains a number of constructors like the default constructor, a constructor with a host and port for the service to connect to, and a few others. One of them is used later on when I start talking about the Replication Sets. Your application should use a single Mongo instance. This instance uses a connection pool internally to provide connections. To obtain a connection, you provide the name of the database. Than you have a DB connection, using this connection you can obtain references to collections. Using the collection you obtain all items using the find method. The following code block shows them all in order.
Mongo mongoDb = new Mongo();
DB db = mongoDb.getDB("axonframework");
DBCollection domainevents = db.getCollection("domainevents");
DBCursor db = Cursordomainevents.find();
That is the most basic query, there are other things you can do. Provide an instance of DBObject to filter the results. The DBObject is also used to sort the results. A special BasicDBObjectBuilder is available to create new DBObjects. The following code block shows them in action.
DBObject mongoEntry = BasicDBObjectBuilder.start()
        .add("aggregateIdentifier",identifier.toString())
        .add("type", type)
        .get();
DBCursor dbCursor = mongo.domainEvents().find(mongoEntry).sort(new BasicDBObject("sequenceNumber",-1));
That is all about looking for data, of course we also need to insert data. The most basic case is almost to easy to show, still I want to, and just because I am the author of this blog, I can :-). In the next code sample aDomainEvent is an instance of DBObject.
mongoDb.getDB("axonframework").getCollection("domainevents").insert(aDomainEvent);
Batch inserts
In some situations you want to insert multiple documents at once. The java driver has a facility for that as well. You can use the batch insert like shown in the following code block.
List<DBObject> entries = new ArrayList<DBObject>();
while (events.hasNext()) {
    DomainEvent event = events.next();
    DomainEventEntry entry = new DomainEventEntry(type, event, eventSerializer);
    DBObject mongoEntry = BasicDBObjectBuilder.start()
            .add("aggregateIdentifier", entry.getAggregateIdentifier().toString())
            .add("sequenceNumber", entry.getSequenceNumber())
            .add("timeStamp", entry.getTimeStamp().toString())
            .add("type", entry.getType())
            .add("serializedEvent", entry.getSerializedEvent())
            .get();
    entries.add(mongoEntry);
}
mongo.domainEvents().insert(entries.toArray(new DBObject[entries.size()]),WriteConcern.SAFE);
If you look closely at the last line, you see we pass an array of DBObject instances to the insert method. Did you see the last parameter? You can also pass a write concern, what that is? Check the next section.
Write concern
By default Mongo sends data to the store and if it is received it is ok. Sometimes you want more than that. It might be very important that content is stored in one node or maybe even in multiple nodes. By providing a WriteConcern you can specify how much safeness you want. NORMAL is the default, just pass it and leave it like that. SAFE only waits for the master by using the getLastError. REPLICAS_SAFE does the same but also waits for the slaves. Be careful when using REPLICAS_SAFE in a test environment without slaves, it will wait and wait.
Object mapping
If you are using object that contain a not to complicated structure, it is not to hard to create a custom mapper for the object to document and document to object. If you do this regularly and the work becomes repetitive you might want to have something easier. You could implement the DBObject interface yourself, that way mongo will create an instance of that object from the document in the datastore. With some basic implementations this might be an interesting way to create your mapping. Personally I do not think this is the way to go, it is to intrusive. Other mapping frameworks are available as well. Personally I think Morphia has the best papers for now. But it only support annotations, which is harder to use when you have library code. With the axon sample I wanted to checkout this approach. But it turns out to be a topic in itself. Therefore I decided no to do it right now. Documentation for the framework is being rewritten at the moment. Therefore I’ll come back to it in another post in the future.
Replication
Mongo supports two mechanisms for replication, Master-Slave and Replica Sets. With respect to scalability another thing called sharding is also very interesting. Sharding is about separating content over multiple Sets. So if you have a very large data set that can be separated like in online shops put the user information in one shard and the product data in another. That is all I am going to say about sharding for now. I’ll focus on replication for now. The documentation can be found at the following link. I strongly advise looking at the video mentioned on the page.
http://www.mongodb.org/display/DOCS/Replication
Master-Slave
The Master slave configuration is well known from other data sources. With Mongo the Master-slave configuration has been proved in production. Configuration is not hard and well documented. A few things I want to mention are:
- slavedelay, you can intentionally put a delay between a master and a slave. This is nice to use as a runtime backup. If you by accident to something stupid, you have an easy way to get things back.
- db.printReplicationInfo(), returns information about the replication from the master perspective
- db.printSlaveReplicationInfo(), returns information about the replication from the slave perspective
Another thing that I definitely want to mention is the oplog. This is a log that is used by the slaves to stay up-to-date. I like the idea that the log is actually stored in the database itself. Be sure to make it big enough or else a longer downtime of your slave will be a big problem.
The biggest thing with Master-slave is that a security mechanism exists. You can configure security constraints based on collections of data. This is not (yet) available for Replica Sets. Other than that, Replica Sets are the way to go for Mongo 1.6 +.
Replica Sets
Some references are: http://www.slideshare.net/mongodb/mongodb-replica-sets, http://www.mongodb.org/display/DOCS/Replica+Set+Tutorial
First start up three nodes for the Replica Set. The following commands start up three nodes
mongod --replSet axon --port 27017 --dbpath /data/r0 --rest
mongod --replSet axon --port 27018 --dbpath /data/r1 --rest
mongod --replSet axon --port 27019 --dbpath /data/r2 --rest
Nodes do not enter the replica set on their own. You have to explicitly add them to the set. You also have to initialize a replica set the first time you use it. The following lines show you just how to do this
> cfg={_id:"axon",members : [{_id:0,host:"localhost:27017"},{_id:1,host:"localhost:27018"},{_id:2,host:"localhost:27019"}]}
> rs.initiate(cfg);
{
	"info" : "Config now saved locally.  Should come online in about a minute.",
	"ok" : 1
}
Be sure to check out what happens when you add a node to the set. The following lines show the log of one of the slaves when the master goes down. After that the node that was the master is restarted
Sun Sep 19 13:14:46 [rs_sync] replSet syncThread: 10278 dbclient error communicating with server
Sun Sep 19 13:14:46 [conn4] end connection 127.0.0.1:59341
Sun Sep 19 13:14:47 [ReplSetHealthPollTask] replSet info localhost:27019 is now down (or slow to respond)
Sun Sep 19 13:14:47 [rs Manager] replSet info electSelf 0
Sun Sep 19 13:14:47 [rs Manager] replSet PRIMARY
Sun Sep 19 13:14:57 [initandlisten] connection accepted from 127.0.0.1:59478 #6
Sun Sep 19 13:16:03 [initandlisten] connection accepted from 127.0.0.1:59565 #7
Sun Sep 19 13:16:03 [ReplSetHealthPollTask] replSet info localhost:27019 is now up
Sun Sep 19 13:16:05 [initandlisten] connection accepted from 127.0.0.1:59567 #8
From the client you want to connect to the master, to find out which node in the set is the master, you can connect to one of the nodes and run the command db.isMaster(), the result is a document containing enough about the replica set to check for the node to connect to.
> db.isMaster()
{
	"setName" : "axon",
	"ismaster" : false,
	"secondary" : true,
	"hosts" : [
		"localhost:27019",
		"localhost:27018",
		"localhost:27017"
	],
	"primary" : "localhost:27018",
	"ok" : 1
}
As you can see my set contains 3 nodes and the primary node is on port 27018. You should always connect to the master node using the shell, or else you get messages like this:
Sun Sep 19 12:25:40 uncaught exception: error: { "$err" : "not master", "code" : 10107 }
In my case I had to start the shell using mongo localhost:27018. With java things are less complicated, the driver selects the primary node by itself. The following xml block shows some example configuration for the Mongo instance using the spring configuration.
    <bean id="mongoDb" class="com.mongodb.Mongo">
        <constructor-arg index="0">
            <list value-type="com.mongodb.ServerAddress">
                <bean class="com.mongodb.ServerAddress">
                    <constructor-arg index="0" value="localhost"/>
                    <constructor-arg index="1" value="27017"/>
                </bean>
                <bean class="com.mongodb.ServerAddress">
                    <constructor-arg index="0" value="localhost"/>
                    <constructor-arg index="1" value="27018"/>
                </bean>
                <bean class="com.mongodb.ServerAddress">
                    <constructor-arg index="0" value="localhost"/>
                    <constructor-arg index="1" value="27019"/>
                </bean>
            </list>
        </constructor-arg>
    </bean>
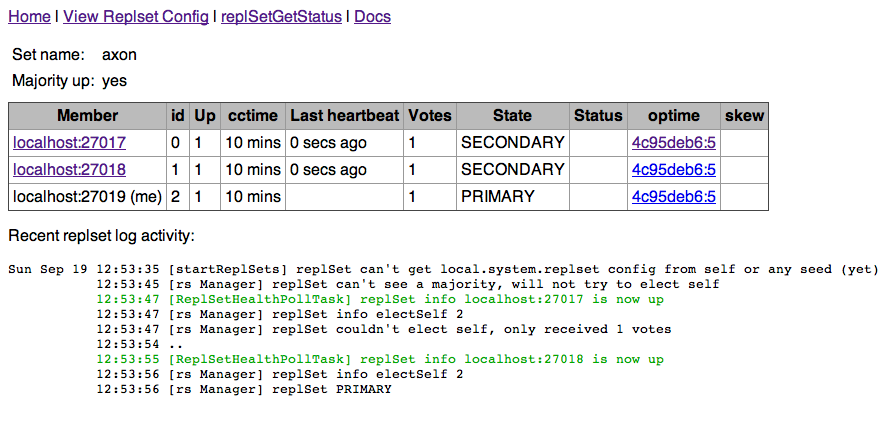
Not to hard is it? Of course this is only very basic usage. There is more to learn in this area, a lot more. One way to learn is to experiment, use the command rs.help() to learn about the commands you have available for the Replication Set. The last thing I want to mention is the web client that you can enable. Pass –rest to the startup command and you can browse to the following url: http://localhost:28019/ and for the status of the replication set: http://localhost:28019/_replSet, This is by default available using the port for the mongodb instance added with 1000. The following screen dump shows the client in action:
That is enough for now, I’ll keep on working with Mongo. Stay tuned for more blog posts about Mongo.
If you want to learn more about Mongo I can recommend the book that is currently being written at manning:
Not a lot of chapters available at the time of writing, but I like what I have seen so far.