There is a lot of talk around the web about autocomplete with ajax. I have blogged about a solution with ajaxtags and spring before (link). It is a nice solutions that works pretty well. Still I did not feel right to have to do a lot of configuration within spring and do something special in your normal code. I also had a look at dwr. This is a nice library that lets you expose a serverside service to your javascript. A number of javascript libraries are generated runtime, you can use these libraries from your scripts within the browser. There is a nice integration with script.aculo.us. Now you can use a lot of components out of the box. Next step, use the script.aculo.us autocomplete component with dwr. Well that is easy said. There are some blog items on the web that tell you how to do this. The best way is to have a look at some sample code Bram smeets made on his blog. I used his code to create a sample that uses maven to build and package. I also used the callisto ide, works very good as well. I would not try the maven plugin yet, I did but it fails for now.
After this rather long introduction, time to get the coding done.
Step1
Get your environment in place. Run the maven archetype command to create a webproject template. Alter some of the default values to make it your project and put in dependencies on the following libraries to your pom.xml file:
spring-webmvc-1.2.7 (org.springframework)
dwr-1.1.1 (uk.ltd.getahead)
Execute the command to setup your eclipse environment and startup eclipse.
commands:
mvn archetype:create -DgroupId=nl.gridshore.ajaxdwrsample -DartifactId=ajaxdwrsample -DarchetypeArtifactId=maven-archetype-webapp
mvn -Dwtpversion=1.0 eclipse:eclipse
Step 2
Time to explain a little bid what the application is going to do. Actually there is two phases in the application. First search for a known postalcode. If you have found the right one and pushed the search button, the accompanying address is obtained. Sounds easy doesn’t it?
We are going to expose a service object with two methods:
public interface RemoteAddressService {
  public AddressTO findAddressByPostalCode(String postalCode);
  public List findCompletePostalCodes(String partPostalCode);
}
It should be obvious what the implementation of this interface should do. To be able to do an easy test, I created a mock implementation for this interface. The mock contains a hashtable with some postal codes as a key and the belonging address as the value. The two methods mentioned before use this hashmap to return all postalcodes or the address for a specific postal code.
public class MockRemoteAddressServiceImpl implements RemoteAddressService  {
  private Map addressByPostalCode = new HashMap();
  public void init() {
    ...
    addressByPostalCode.put("1234AA", new AddressTO("streetone","1","cityone","1234AA"));
    ...
  }
  public AddressTO findAddressByPostalCode(final String postalCode) {
    return (AddressTO)addressByPostalCode.get(postalCode);
  }
  public List findCompletePostalCodes(final String partPostalCode) {
    Set keys = addressByPostalCode.keySet();
    List retKeys = new ArrayList();
    for (Iterator iter = keys.iterator();iter.hasNext();) {
      String key = (String)iter.next();
      retKeys.add(key);
    }
    return retKeys;
  }
}
Fianlly there is a transferobject called AddressTO that contains the following 4 fields: streetname, houseNumber, city, postalCode. Download the source to have a look.
We have created the interface and an implementation. Time to do some spring configuration. We only need to create one bean, therefore the config file is very easy
<beans>
  <bean id="addressServiceFacade"
    class="nl.gridshore.ajaxdwrsample.service.impl.MockRemoteAddressServiceImpl"
    init-method="init"/>
</beans>
Step 3
After this everything is in place to configure dwr to expose the spring bean. To be able to use dwr, we first need to add the dwr servlet to the web.xml file and load the spring context:
<context-param>
  <param-name>contextConfigLocation</param-name>
  <param-value>/WEB-INF/applicationContext.xml</param-value>
</context-param>
<listener>
  <listener-class>org.springframework.web.context.ContextLoaderListener</listener-class>
</listener>
<servlet>
  <servlet-name>dwr</servlet-name>
  <servlet-class>uk.ltd.getahead.dwr.DWRServlet</servlet-class>
  <init-param>
    <param-name>debug</param-name>
    <param-value>true</param-value>
  </init-param>
</servlet>
<servlet-mapping>
  <servlet-name>dwr</servlet-name>
  <url-pattern>/dwr/*</url-pattern>
</servlet-mapping>
Dwr uses a configuration file to configure the beans that are exposed to your javascripts. This file is next to web.xml and is called dwr.xml.
<dwr>
  <allow>
    <create creator="spring" javascript="AddressServiceFacade">
      <param name="beanName" value="addressServiceFacade"/>
    </create>
    <convert converter="bean" match="nl.gridshore.ajaxdwrsample.to.AddressTO"/>
  </allow>
</dwr>
By default you allow all methods to be called, you should allow only the real ajax usable methods. The create element is like the constructor, I tell dwr to use spring to create the javascript object AddressServiceFacade based on the spring bean addressServiceFacade. Because a use a transfer object for the address I also need the converter.
Everything is ready to do the first test. Deploy the application to tomcat and call the following url: http://localhost:8080/ajaxdwrsample/drw
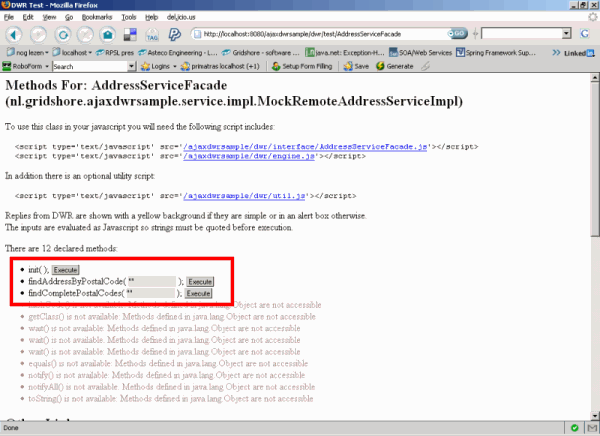
You should get a page with a link to AddressServiceFacade, click this link and have a look at the next page:

On this screen you can test your dwr ajax service. Use the execute buttons and input boxes to test the services (see the red box). Great isn’t it?
Step 4
And now for the webpages. First add the script libraries to your war file. I added the Prototype script and the script.aculo.us. to the folder “scripts”. Next to that I added to style sheets (I copied all these files from the sample by Bram Smeets). Out of the box there is no support in script.aculo.us for autocomplete via dwr. Therefore I used the excellent component from Bram to implement it. The component resides in the “autocomplete.js” file. Finally the index.jsp that implements the real automcomplete component.
The includes:
<link rel="stylesheet" type="text/css" href="/ajaxdwrsample/styles/autocomplete.css"/>
<script type='text/javascript' src='/ajaxdwrsample/dwr/interface/AddressServiceFacade.js'></script>
<script type='text/javascript' src='/ajaxdwrsample/dwr/engine.js'></script>
<script type='text/javascript' src='/ajaxdwrsample/dwr/util.js'></script>
<script type="text/javascript" src="/ajaxdwrsample/scripts/prototype/prototype.js"></script>
<script type="text/javascript" src="/ajaxdwrsample/scripts/script.aculo.us/effects.js"></script>
<script type="text/javascript" src="/ajaxdwrsample/scripts/script.aculo.us/controls.js"></script>
<script type="text/javascript" src="/ajaxdwrsample/scripts/autocomplete.js"></script>
Important in the includes is the AddressServiceFacade, this is the generated script file by dwr based on the dwr.xml file. There we configured this name … javascript=”AddressServiceFacade” …. Now the standard scripts are in place, do the html thing:
<input id="searchPostalCode" type="text" />
<input type="button" value="Search" onclick="handleAddClick();"/>
<div id="postalCodeList" class="auto_complete"></div>
<script type="text/javascript">
   new Autocompleter.DWR('searchPostalCode', 'postalCodeList', updateList,{ valueSelector: nameValueSelector, partialChars: 0 });
</script>
The constructor for the autocomplete component has 4 parameters:
- searchPostalCode – Field to obtain the string from that has to autocompleted
- postalCodeList – Id of the div that will be filled with the found autocomplete items
- updateList – name of the script to use as callback function by the autocomplete script
- Options to pass to the autocomplete script
The callback function looks like this:
function updateList(autocompleter, token) {
   AddressServiceFacade.findCompletePostalCodes(token, function(data) {
      autocompleter.setChoices(data)
   });
}
function nameValueSelector(tag){
   return tag;
}
Doesn’t look very difficult, does it? Beware of the function nameValueSelector, it receives a tag object. This can be a simple object (like in my case, a string). It can also be a javabean representation, then you need an extra method to obtain the property to show in the autocomplete box. If you return a list with AddressTO objects and want to show the postalCode of the address, this line would be : return tag.postalCode.
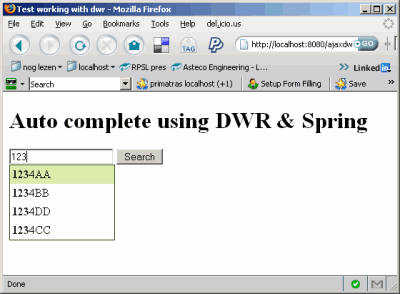
The autocomplete box will now look like the following image:

Your autocomplete is done, there is one extra thing in the sample. You can select the postal code and look for the belonging address. That is done the with the following piece of html and javascript.
<span id="streetname"></span> <span id="houseNumber"></span><br/>
<span id="postalCode"></span><br/>
<span id="city"></span><br/>
The id’s of the span elements resemble the fields of the AddressTO javabean. With the help of the dwr utility package we can easily fill these spans with data obtain via dwr. This is done with the following to functions.
function handleAddClick() {
   var searchString = DWRUtil.getValue('searchPostalCode');
   AddressServiceFacade.findAddressByPostalCode(fillAddress,searchString);
}
function fillAddress(anAddress) {
   formAddress = anAddress;
   DWRUtil.setValues(anAddress);
}
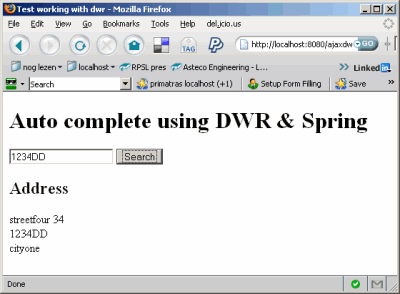
The handleAddClick button receives the onClick event from the search button. First we obtain the value from the input field, then we call the dwr javascript object. This method obtains 2 parameters, one more than the real method. The extra parameter is the callback function. This function gets called with the return value of the original java function. We configured the fillAddress function to be the callback function. The special util function “DWRUtil.setValues” sets the values of the address to the spans. The end result looks like this:

Download the sources here : ajaxdwrsample.zip
That’s it, hope you like this article. Thanks again to Bram Smeets for his autocomplete component and of course the excellent dwr and script.aculo.us frameworks.