In this post we focus on getting the task based user interface. We have the basic building blocks in the application, but the screens are a bit stupid. How many applications would you create where you have to manually copy the identifier of a contact to an address when you want to register an address for this contact. Well in the current version of the application this is what you really have to do.
What are the tasks that we focus on right now:
- Create a new contact
- Remove a contact
- Change the name of a contact
- Register an address of a certain type for a specific contact
- Remove an address from a contact
But before we step into creating the front-end, we install some plugins that I discussed in previous posts.
Plugins
- Db-util – mainly used for testing
- Navigation – change the templates as well as add navigation stuff to the controller
Get our grails hands dirty
Task driven – Create a new contact, remove a contact, change name of a contact
Time to start working on the tasks. The first is a basic one: Create a new contact. This is one that comes out of the box, but we now have different navigation and I only want to show the fields that can actually be entered. For a contact that is only the name.
When creating new views I like to generate the views and start from the result. I took the list view first, removed the navigation part and shuffled the columns.
We move on to the create.gsp and the edit.gsp. Again we remove the input fields for items we do not need. In this case this is purely the identifier field. Of course I also remove the navigation. After testing the create screen, now without the identifier field I found out we need to change the constraints of the Contact object. We have to add nullable is true.
Let us move on to a more interesting task
Register an address of a certain type for a specific contact
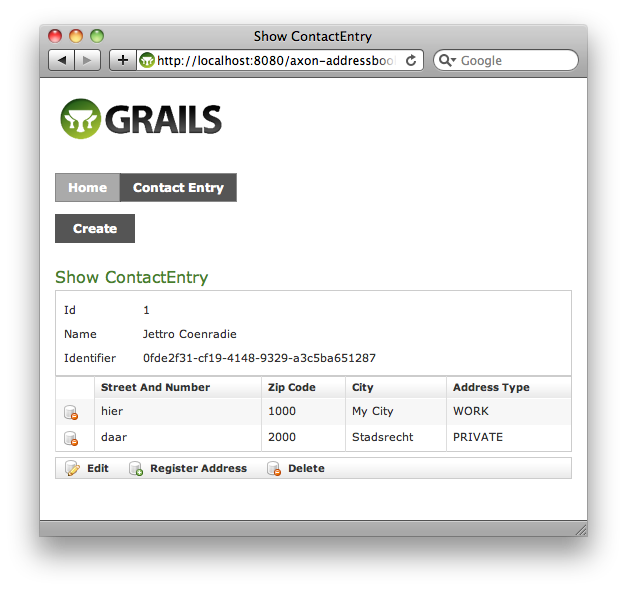
At the moment we use the AddressEntryController to have a look at the addresses. This is about to change. Now we are going to show the available addresses in the contact details screen. This is also the screen where we present the tasks to remove an address and to register a new one.
We start with creating the button to add an address. We reuse the add button as provided by grails. There is a difference, the add button usually is presented in the top bar, we however want it in the bottom bar. Therefore we must add a class to the stylesheet and the following button to the bottom button bar:
<span class="button">
  <g:actionSubmit class="add" action="registerAddress"
      value="${message(code: 'orderEntry.button.registerAddress.label', default: 'Register Address')}"/>
</span>
Another part of the show Contact page we need to change is the part where we actually show the addresses of the contact. I use the generated code for the list.gsp of address entries. I remove the pagination part, but other than that it is the same. Except for one column. We do want to be able to delete addresses. Therefore I have added an image with the a link to the delete action. This link with an image is shown in the next line of code.
<g:link action="deleteAddress" id="${addressEntryInstance.id}">
<img src="${resource(dir:'images/skin',file:'database_delete.png')}" alt="delete">
</g:link>
Check out the way to create the link, just define the action and pass it an id. That is enough to be wired to the actual action method on the controller. I also like the way to create a link to an image. The resource method is used to point to a directory and the actual file. No need to think about web context url or things like that.
The final screen we need is the registerAddress form. It is mostly a copy of the edit.gsp of the address entry. I also do not want the contact name and contact identifier to be editable. Finally I changed the action of the form into saveAddress.
The final thing I want to have a look at is the groovy code of the controllers. The following code block shows all three methods that are important with respect to the addresses. The code is pretty straightforward.
    def registerAddress = {
        def contactEntryInstance = ContactEntry.get(params.id)
        def addressEntryInstance = new AddressEntry();
        addressEntryInstance.contactIdentifier = contactEntryInstance.identifier
        addressEntryInstance.contactName = contactEntryInstance.name
        [addressEntryInstance: addressEntryInstance]
    }

    def saveAddress = {
        def addressEntryInstance = new AddressEntry(params)
        if (addressEntryInstance.validate()) {
            def foundContact = ContactEntry.findByIdentifier(addressEntryInstance.contactIdentifier)
            contactCommandHandlerService.registerAddress(
                    addressEntryInstance.addressType,
                    addressEntryInstance.contactIdentifier,
                    addressEntryInstance.streetAndNumber,
                    addressEntryInstance.zipCode,
                    addressEntryInstance.city)
            flash.message = "${message(code: 'default.created.message', args: [message(code: 'addressEntry.label', default: 'AddressEntry'), addressEntryInstance.city])}"
            redirect(action: "show", params:[id:foundContact.id])
        }
        else {
            render(view: "registerAddress", model: [addressEntryInstance: addressEntryInstance])
        }
    }

    def deleteAddress = {
        def addressEntryInstance = AddressEntry.get(params.id)
        if (addressEntryInstance) {
            contactCommandHandlerService.removeAddress(addressEntryInstance.addressType, addressEntryInstance.contactIdentifier)
        }
        def foundContact = ContactEntry.findByIdentifier(addressEntryInstance.contactIdentifier)
        redirect(action: "show", id: foundContact.id)
    }
Again a lot of copy paste from the generated controller. But here we use the contactCommandHandlerService to create the commands that are send back to the server. In all three methods we use the query datasource to obtain the contact data. As you can see, we do not store anything in the query database. That is all handled by the commands and events. Than in the event listener we receive the domain events and update the query database. The following and last code block gives you the action that handles the AddressDeletedEvent.
    private void doHandle(AddressRemovedEvent event) {
        ContactEntry foundContact = ContactEntry.findByIdentifier(event.aggregateIdentifier.toString())
        AddressEntry foundAddress = AddressEntry.findByAddressTypeAndContactIdentifier(event.addressType,foundContact.identifier)
        if (foundAddress) {
            foundAddress.delete()
        }
    }
Oke because I actually forgot to implement this correct at first, the listener for ContactDeletedEvent. I forgot to remove the addresses for the contact. We have a table with contacts and a table that combines the contact information with the address information. Therefore we have to do two delete actions.
    private void doHandle(ContactDeletedEvent event) {
        ContactEntry foundContact = ContactEntry.findByIdentifier(event.aggregateIdentifier.toString())
        List<AddressEntry> foundAddresses = AddressEntry.findAllByContactName(foundContact.name)

        foundContact.delete()

        foundAddresses.each {address ->
            address.delete()
        }
    }
The following image gives you an idea about the screen.
That is it for now, in my next and final blogpost about this example I will show the advantage of having these simple screen oriented tables.