Lately I have been doing a lot with JMX. I use it more and more to check what my application is doing. I use it to monitor tomcat, the cache, queue’s and other libraries and components. Now I wanted to use jmx to monitor my own application. Using the standard JMX stuff coming with the JDK is not hard, but since I use a lot of spring, I wanted to know more about spring support.
The most important question in the end will be, is it easier to use spring with jmx than the standard jmx stuff from the jdk.
Read on to find out about jmx and my answer to the question which is easier, the spring way or the standard jmx way.
Background
Java Management Extension was introduced to create a uniform way to manage your java applications. A very basic console was introduced jConsole. You can now monitor the cpu usage of the jvm, memory consumption and lots of other characteristics. Frameworks and tools like tomcat, ActiveMQ and EHcache provided a lot of information through jmx.
Allard has written a whitepaper about jmx that you can find on the jteam website:
http://www.jteam.nl/dms/whitepapers/JavaApplicationMonitoringAndManagement.pdf
I want to have a better look at providing your own management information through jmx. For a project I was interested in the internals of a connection pool. I wanted to learn about the amount of active connections, the idle connections, passivations and activations. For the Axon Framework we wanted to have a better insight in the amount of event listeners, command handlers, received events and handled commands. For Axon we want to use as little springframework as possible and for the other project with the connections pool I want the easiest solution.
I big advantage of jmx is that you are able to use a generic client to access it. Disadvantage is that you must have this generic client and that firewalls must enable you to connect to the jmx server. Therefore I want to have a very basic web client that provides the most basic jmx information through a web interface.
Introducing the example
The sample is a very basic service that is used to store contacts. The service provides a statistics object that keeps data about the amount of stored contacts. If you are looking for code, check the code at my source repository at google code.
http://code.google.com/p/gridshore/source/browse/#svn/trunk/JMXMonitor
MBeans the jdk way
The jdk comes with jmx out of the box. It is not hard to use. You must create an interface that ends with MXBean or use the annotation. Of course there must be an implementation as well. The implementation is than used to manage facets of your application. In our example we expose one parameter, the amount of registered contacts. The implementation uses the ContactServiceStatistics from the the ContactService. This statistics object exposes the amount of registered contacts.
Now we need to actually do something with jmx. There are two major steps:
- Obtain the platform mbeanserver
- Register the MXBean with the mbeanserver
Now we can interact with the service by adding contacts. Using the jdk provided jmx client, we can see the amount of registered contacts. The following code block shows the code for the Runner class that executes the example and provides the command line interface to add new contacts.
public class Runner {

    public static void main(String[] args) throws Exception {
        MBeanServer mbeanServer = ManagementFactory.getPlatformMBeanServer();
        ContactService service = new InMemoryContactService();

        ContactServiceMonitorMXBean mbean = new ContactServiceMonitor(service);
        ObjectName monitorName = new ObjectName("Gridshore:name=contactServiceMonitor");
        mbeanServer.registerMBean(mbean, monitorName);

        String input = "";
        do {
            System.out.println("Type stop if you want to, well euh, stop !");
            input = (new BufferedReader(new InputStreamReader(System.in))).readLine();
            service.addContact(new Contact(0, input));
        } while (!"stop".equals(input));
    }
}
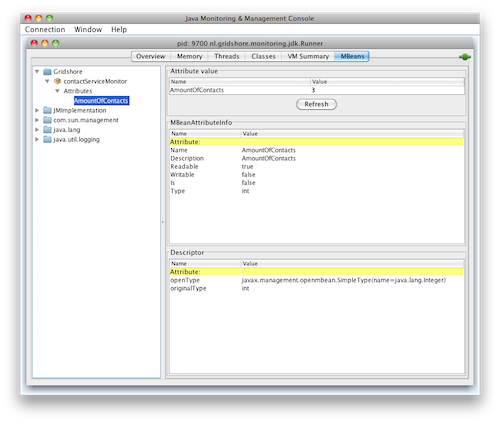
The amount of code is oke, not very hard to implement. The following image gives a screendump of jconsole with the MXBean in it. Notice the location of the MXBean. The ObjectName is used to determine the location for the bean. The configured name is “Gridshore:name=contactServiceMonitor” which can easily be identified in the jconsole image.

MBeans the spring way
Now let us have a look at what spring can do for us when doing jmx. The support for jmx from spring is extensive. A complete section in the reference manual is dedicated to jmx. We are only touching a small part, but an important part. You can find out more about the spring jmx way here:
http://static.springsource.org/spring/docs/3.0.x/spring-framework-reference/html/jmx.html
If you know your way with spring, the first thing that comes to mind is xml. Oke, nowadays a lot of annotations make life easier. With spring, the jdk way to find the mbeanserver and to register the beans is made easier. The javacode is replaced with some xml and annotations. I agree that in this specific case with the very basic sample the jdk way might even look easier. Still it fit’s nice with our own spring applications and there is a very big advantage using spring. That is when you want to create your own client. Spring comes with something nice to support that, this is explained in the next section.
The spring solution again consists of an interface and an implementation. The interface is actually only used for the client, so we could do with only the java class. Than we need an xml config file with only two items:
<beans>
    <context:component-scan base-package="nl.gridshore.monitoring"/>
    <context:mbean-export registration="replaceExisting"/>
</beans>
The runner now becomes incredible easy. The following lines of code show the complete runner
public class Runner {
    public static void main(String[] args) throws IOException {
        ClassPathXmlApplicationContext context = new ClassPathXmlApplicationContext(
                "nl/gridshore/monitoring/springannotation/spring-config.xml");
        ContactService service = context.getBean(ContactService.class);

        String name = "";
        do {
            System.out.println("Type stop if you want to, well euh, stop !");

            name = (new BufferedReader(new InputStreamReader(System.in))).readLine();
            service.addContact(new Contact(0,name));
        } while (!"stop".equals(name));
    }
}
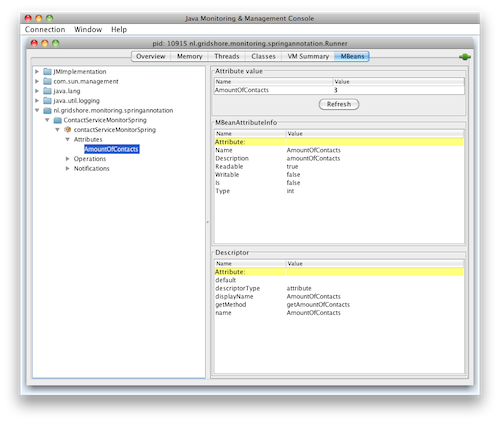
Now the jconsole looks like the following image. Check that we now have an additional folder in the folder tree. This is the type of the bean that is registered with the mbeanserver. More on this name when we discuss the client.

JMX clients
Nice to show the data through the jconsole application. There is a catch. Of course you need to have java to start the console. But you also need to explicitly enable it for remote access. Usually this mean firewall changes. Not the easiest way. If you want basic information it might be easier to create a client yourself.
Of course the jdk comes with client capabilities as well. I did however not spend a lot of time looking at them. With spring it becomes so easy to create a client that I only look at the spring way to create a client. Check out the following page if you want more information.
http://java.sun.com/docs/books/tutorial/jmx/remote/custom.html
Spring proxy
Spring comes with a class that acts as a proxy to an MBean. This can be a bean of yourself, a bean provided by a library but also a bean running in a remote jmx server. The following lines show the addition xml configuration for the proxy. You need an interface that is implemented by the proxy. It is easy if the MXBean implements this interface, but as long as the methods are available it is not required. Using this interface you can inject the proxy into another class, the JMXTestClient. Which in itself can be a controller or a service in your own application.
<bean id="proxyContactServiceMonitor" class="org.springframework.jmx.access.MBeanProxyFactoryBean">
    <property name="objectName"
              value="nl.gridshore.monitoring.springannotation:name=contactServiceMonitorSpring,type=ContactServiceMonitorSpring"/>
    <property name="proxyInterface" value="nl.gridshore.monitoring.springannotation.ContactServiceMonitor"/>
</bean>
Have a good look at the value for objectName. It consists of the package name of the class that is registered as an mbean. The name is is the registeren spring bean name and the type is the actual class name.
Now the client becomes very easy. The following code block shows the client as well as the new Runner class that makes use of the client.
@Component("client")
public class JmxTestClient {
    private ContactServiceMonitor contactServiceMonitor;

    public int obtainAmountOfContact() {
        return contactServiceMonitor.getAmountOfContacts();
    }

    @Autowired
    public void setContactServiceMonitor(@Qualifier("proxyContactServiceMonitor")ContactServiceMonitor contactServiceMonitor) {
        this.contactServiceMonitor = contactServiceMonitor;
    }
}
public class Runner {
    public static void main(String[] args) throws IOException {
        ClassPathXmlApplicationContext context = new ClassPathXmlApplicationContext("nl/gridshore/monitoring/springannotation/spring-config.xml");
        ContactService service = context.getBean(ContactService.class);

        String name = "";

        do {
            int amountOfContacts = context.getBean(JmxTestClient.class).obtainAmountOfContact();

            System.out.println("Amount of contacts now is : " + amountOfContacts);

            System.out.println("Type stop if you want to, well euh, stop !");

            name = (new BufferedReader(new InputStreamReader(System.in))).readLine();
            service.addContact(new Contact(0,name));
        } while (!"stop".equals(name));
    }
}
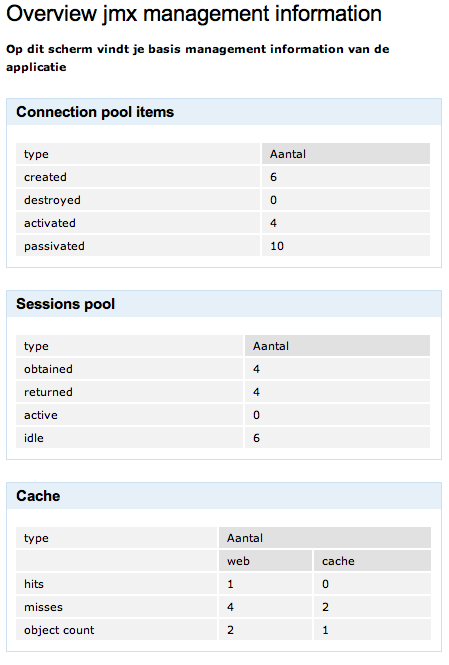
The following code block shows you a screendump of a jmx client that is used to monitor the amount of items and sessions in a connection pool as well as basic information about the cache in use.

Conclusion
I like the way spring helps you in hiding some complexity. To be honest with these simple examples spring is not less code than with the plain jdk way of jmx interaction. But if the amount of beans increase, to my opinion spring becomes easier. If you are already creating a spring application I would also do the spring way, it just fits better.